I bought a Start-2-XS-SATA from Online.net. For its low cost and high amount of storage I thought I could turn it into a nice little LXD server. These directions are pretty standard and should work with just about anything from Online.net, but the benefit here is the cheap server and not having to buy multiple IPv4. Also note this was tested on Ubuntu 18.04 because LXD does not easily ship on Debian yet.
First some house keeping and pre-req installs
sudo apt-get update && sudo apt-get dist-upgrade -y
sudo apt-get install lxd bridge-utils ifupdown iptables-persistent -y
sudo service bind9 stop
sudo apt-get purge bind9
Add these lines to /etc/sysctl.conf
net.ipv6.conf.all.forwarding=1
net.ipv6.conf.all.proxy_ndp=1
net.ipv6.bindv6only=1
net.ipv4.ip_forward=1
Then run
sudo sysctl -p
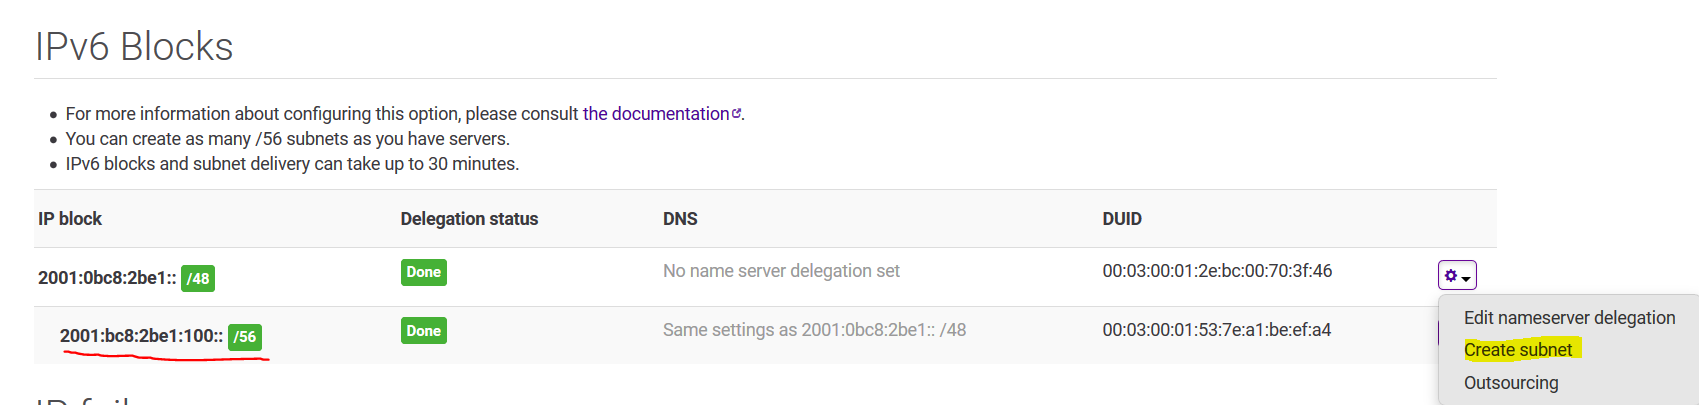
Now you have to create a new subnet from your existing IPv6, by going to the online.net console
You request a new subnet on your /48 and then you will get a /56 below. Note your IPv6 will obviously be different.
Now we need to adjust the network interface configuration on the server.
Open /etc/network/interfaces in your favorite $EDITOR
# The loopback network interface
auto lo
iface lo inet loopback

# The primary network interface
auto enp0s20
allow-hotplug enp0s20
iface enp0s20 inet dhcp
iface enp0s20 inet6 static
address  2001:bc8:2be1::1 #CHANGE THIS TO  MATCH YOUR NETWORK
netmask 48
accept_ra 1
pre-up /sbin/dhclient -1 -v -pf /run/dhclient6.enp0s20.pid -lf /var/lib/dhcp/dhclient6.enp0s20.leases -cf /etc/dhcp/dhclient6.conf -6 -P enp0s20


iface lxdbr0 inet6 static
address 2001:bc8:2be1:100::1 #CHANGE THIS TO  MATCH YOUR NETWORK
netmask 56
accept_ra 2
pre-up /sbin/dhclient -1 -v -pf /run/dhclient6.lxdbr0.pid -lf /var/lib/dhcp/dhclient6.lxdbr0.leases -cf /etc/dhcp/dhclient6.conf -6 -P lxdbr0
Also edit /etc/dhcp/dhclient6.conf and add the following info:
interface "enp0s20" {
send dhcp6.client-id 00:03:00:01:2e:bc:00:70:3f:46;
request;
}
interface "lxdbr0" {
send dhcp6.client-id 00:03:00:01:53:7e:a1:be:ef:a4;
request;
}
sudo service networking restart
Now we intialize lxd
sudo lxd init
You will present with a little wizard/walkthrough fill it out like follows:
Would you like to use LXD clustering? (yes/no) [default=no]:
Do you want to configure a new storage pool? (yes/no) [default=yes]:
Name of the new storage pool [default=default]:
Would you like to connect to a MAAS server? (yes/no) [default=no]:
Would you like to create a new local network bridge? (yes/no) [default=yes]:
What should the new bridge be called? [default=lxdbr0]:
What IPv4 address should be used? (CIDR subnet notation, “auto” or “none”) [default=auto]:
What IPv6 address should be used? (CIDR subnet notation, “auto” or “none”) [default=auto]: 2001:bc8:2be1:100::1/56 #CHANGE TO MATCH YOURS
Would you like LXD to NAT IPv6 traffic on your bridge? [default=yes]: no
Would you like LXD to be available over the network? (yes/no) [default=no]:
Would you like stale cached images to be updated automatically? (yes/no) [default=yes]
Would you like a YAML "lxd init" preseed to be printed? (yes/no) [default=no]:
Then some more lxd customizations for networking:
sudo lxc network set lxdbr0 ipv6.nat false
sudo lxc network set lxdbr0 ipv6.routing true
sudo lxc network set lxdbr0 ipv6.dhcp.stateful false
That’s it! Now let’s fire up the first test container:
sudo lxc launch ubuntu:18.04
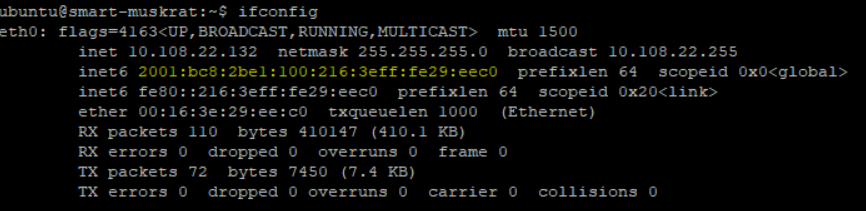
sudo lxc exec smart-muskrat -- sudo --login --user ubuntu
If everything went right you should be in a bash shell of a new ubuntu container, and be able to ping6 the outside world.
IPv6 in a still IPv4 world Some ideas since IPv4 is still usually needed in most parts of the world.
Script to port forward on your only IPv4
#make sure you change Public IP and Container IP
PORT=8999 PUBLIC_IP=163.172.214.186 CONTAINER_IP=10.0.170.18 sudo -E bash -c 'iptables -t nat -I PREROUTING -i enp0s20 -p TCP -d $PUBLIC_IP --dport $PORT -j DNAT --to-destination $CONTAINER_IP:$PORT -m comment --comment "forward 2 container"'
You could also order more failover IPs from Online.net
Lastly, and the option I opt for, is to put your domain and AAAA record behind Cloudflare
 This really only works for HTTP/HTTPS but it works really well via Cloudflare’s reverse proxy system.